
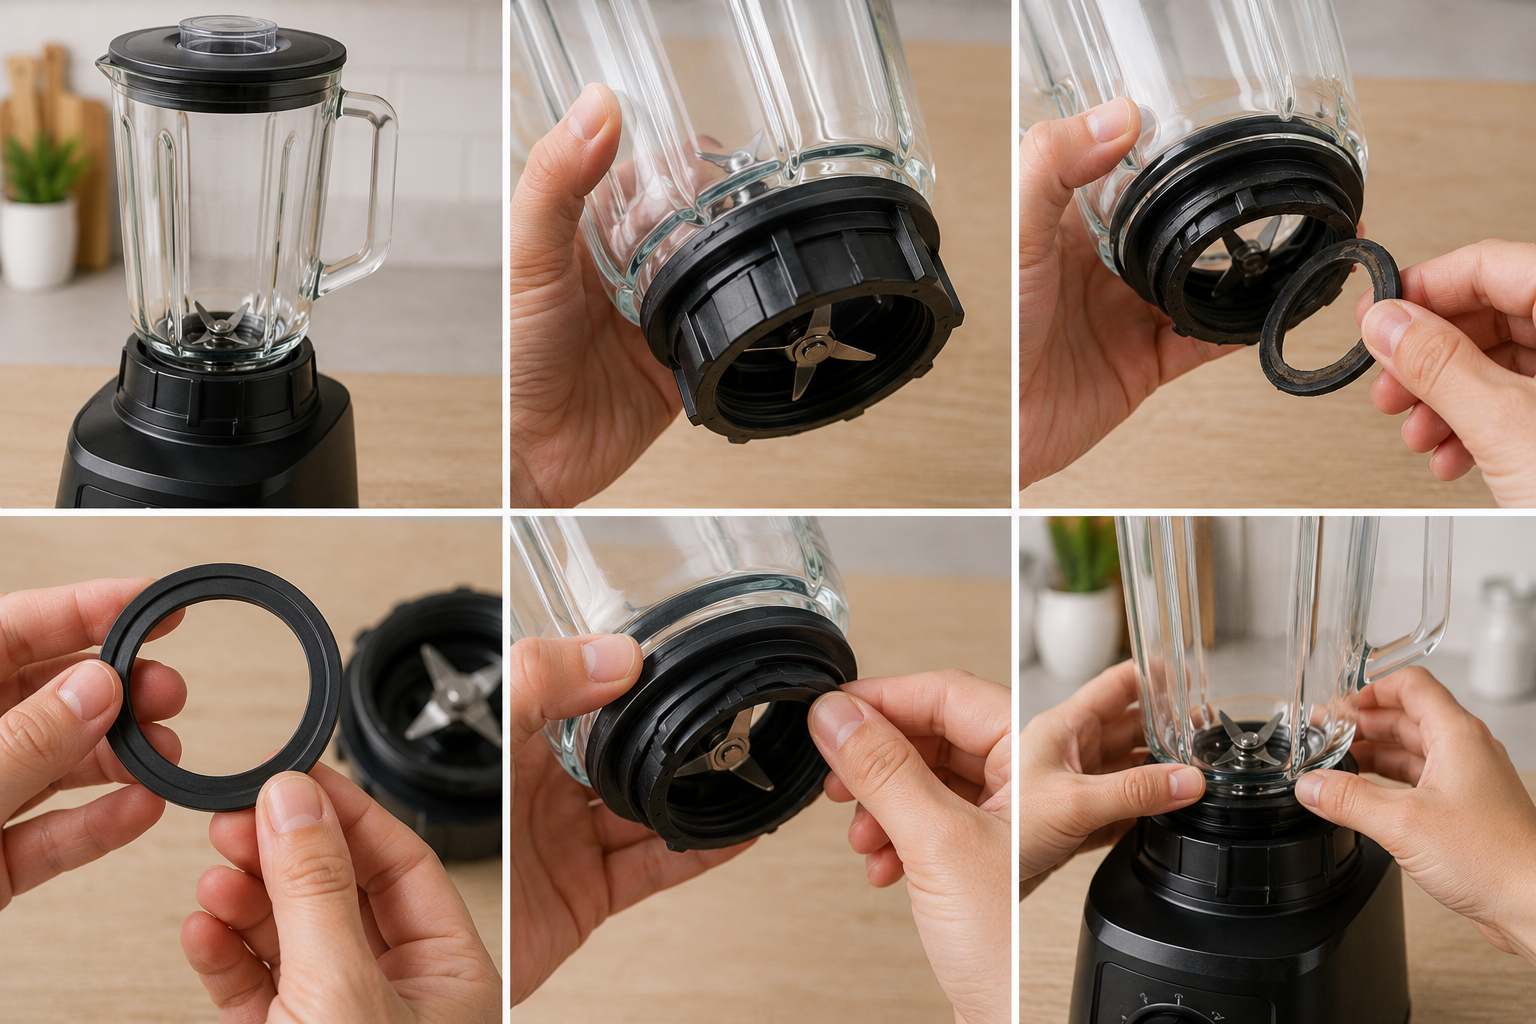
A leaking blender can turn a simple smoothie or soup into an annoying kitchen cleaning chore in no time. One moment, everything is fine; the next, you see liquid leaking from the bottom of the blender, causing puddles to form at the bottom or spilling onto the countertop. Often, the problem lies not with the motor or the mixing bowl itself, but with a worn gasket.
This small rubber ring may seem insignificant, but it is crucial for a watertight connection between the mixing bowl and the blades. After months or even years of use, the gasket wears out due to high temperatures, humidity, friction, and repeated cleaning. Fortunately, this is usually easy to repair, and most people can do it at home without any experience.
With a suitable replacement gasket and careful installation, many blenders can function properly again within 30 minutes.
The Role of the Blender Gasket:
There is a gasket between the mixing bowl and the blades. This ensures a good seal and prevents liquid from leaking when the blades are rotating at high speed. Over time, the seal gradually ages, and small gaps develop around the connection. Any damage, no matter how small, causes liquid to leak down during blending. Sometimes it leaks slowly; sometimes it is noticeable almost immediately.
A leaking seal can cause moisture to accumulate at the bottom of the blender jug or around the base. Some users may also experience strange vibrations or rattling noises during blending because the seal is not strong enough to hold the blender jug in place.
In many kitchens, people mistakenly think that the blender jug itself is broken, while the underlying problem is simply an ageing seal that no longer seals properly.
How to Determine When the Seal Needs to be Replaced:
Some seal problems are immediately recognisable, such as a large amount of liquid leaking from the bottom of the blender jug. Other problems develop gradually. Prolonged use of rubber seals often causes them to harden, flatten, become brittle, or stretch slightly. Old seals can even become sticky or retain an unpleasant food odour, no matter how carefully they are cleaned.
Another clear warning sign is visible food residue around the seal. If the rubber loses its elasticity, it no longer seals properly against the blender jug and blade block.
Years of experience have taught me that most seal defects develop gradually. Customers often get used to minor leaks until the situation suddenly worsens, at which point they realise how poor the seal is.
Choosing the Right Replacement Seal:
Before ordering a replacement seal, always check if it matches your blender model. Many seals look almost identical at first glance, but they may differ slightly in thickness, diameter, or shape.
Choosing the wrong size can lead to persistent leaks after installation. If the seal is not compatible with a specific blender, it may come loose or twist when tightened.
The easiest way to check this is by looking at the model number on your blender. Another way to avoid ordering the wrong part is to compare a photo of your old seal with a photo of the replacement seal.
If possible, it is best to choose manufacturer-certified replacement seals. Some cheap universal seals work fine, while others wear out quickly or do not seal properly.
Preparing to Repair Your Blender:
Replacing the seal requires only a few simple tools. The process typically involves a new seal, warm soapy water, a soft cloth, and a small cleaning brush.
Before touching the blade unit, always unplug the blender completely. Place the blender on a sturdy surface in a well-lit room. Although replacing the blade unit is simple, you must still be careful with the sharp blades.
If the blender has recently been used to make thick dishes such as smoothies, soups, or nut sauces, rinse the blending jug first. This makes disassembly easier and safer, as residual grease can make the parts difficult to grip.
Removing the Old Seal:
Remove the blending jug from the base and then carefully unscrew the blade unit or the retaining ring from the bottom of the jug.
Some parts can be unscrewed by hand, while others are stuck because dried food residue can form a sticky, glue-like substance around the threads. The use of a rubber anti-slip mat can often help to loosen seized parts without damaging the plastic components.
After removing the blade unit, the old seal can usually be easily removed by hand.
At this point, signs of wear are usually more visible upon closer inspection. Generally, small cracks, hardened rubber, flattened edges, or uneven stretching indicate that the seal is severely aged.
Cleaning Before Installing a New Seal:
Before installing a new seal, the sealing area must be thoroughly cleaned. This is often one of the most overlooked steps in the maintenance process.
Even a small amount of dried dirt around the threads or contact surfaces can hinder the correct installation of the new seal. Furthermore, uneven pressure can also cause leakage with the new seal.
Usually, warm soapy water and a small brush are sufficient to clean the blade unit, the recesses in the catch basin, and the adjacent contact surfaces. After cleaning, all parts must be thoroughly dried before reassembling.
This step is much more important than people realise. Even with a brand-new seal, leakage can occur if food residue remains inside the seal.
Installing a New Gasket Correctly:
The new gasket must be placed in the same position as the original gasket, without twisting or stretching it.
A common mistake is uneven installation of the gasket, with slight bumps or gaps at the edges. The gasket must fit smoothly against the blades.
Most blender gaskets are designed for dry use and generally do not require oil or lubricant, unless the manufacturer explicitly states otherwise.
After you have installed the gasket correctly, carefully place the blades back in. Tighten them sufficiently to create a good seal, but do not overtighten them.
Surprisingly, overtightening is a common problem. This can actually cause the gasket to deform or the plastic threads to break, rather than improving the seal.
Why Blenders Sometimes Still Leak After Replacement:
Another problem can explain why some blenders still leak, even after correctly replacing the gasket.
Some common causes are:
- Incorrect gasket installation
- Twisted sealing ring during installation
- Incorrect tightening of the blades
- Cracked mixing bowl
- Damaged threads on the blades
Some sealing rings are slightly tapered on the sides and require a specific installation direction. If the gasket is not perfectly flat, checking the original orientation usually solves the problem.
Older blender blades may have worn threads, making a good seal impossible even after replacing the gasket.
How to Help Blender Gaskets Last Longer:
Gaskets wear out over time, but with a few simple habits, you can significantly extend their lifespan.
Washing by hand is generally better for gaskets, as the high temperatures of repeated use in the dishwasher can accelerate the drying out or deformation of the rubber. Washing the blender as soon as possible after use also prevents acidic foods and grease from remaining on the gasket for extended periods.
It also prevents the blender cup from being tightened too much during normal use. Usually, the correct size is sufficient. Prolonged, excessive force will compress the gasket unnecessarily, shortening its lifespan. It is also important to keep the gasket area clean, as food residue can cause uneven pressure on the gasket over time.
Solving Persistent Leak Issues:
If leakage occurs after installation, carefully check the sealing ring to ensure it is correctly positioned and not compressed or twisted.
Next, inspect the mixing bowl under a strong light for small cracks. Small cracks at the bottom of the bowl strongly suggest a problem with the sealing ring.
If leakage only occurs when mixing at high speed, it may be as simple as slightly tightening the screws at the bottom of the mixing bowl.
In some cases, persistent leakage indicates wear on the blade bearing, rather than a problem with the sealing ring. Wear in the ageing blade bearing can cause a poor seal.
Frequently Asked Questions:
Why is my blender leaking at the bottom?
The most common cause is an old or damaged gasket between the mixing bowl and the blades. Liquid can leak through cracks or dents, or even due to improper installation.
Can I use a blender without a gasket?
No. A gasket is a watertight barrier that prevents leakage during blending. Without a gasket, serious leaks can occur, potentially damaging your blender.
How often should blender gasket seals be replaced?
There is no fixed replacement cycle, but most sealing rings last one to three years, depending on usage, cleaning habits, and exposure to heat.
Are blender seals universal?
Most sealing rings are not universal. There are many brands and models of blenders, and each blender may require a specific size and shape of sealing ring for a proper seal.
Why is my blender still leaking, even after I have replaced the sealing ring?
Common causes include improper installation, overtightening, a broken mixing bowl, damaged threads, or an aging blade block causing a poor seal.
Conclusion:
Replacing a blender seal is a common kitchen maintenance task that can make your blender look like new again. Often, replacing the seal immediately resolves leaks and ensures a smoother and more consistent blending result.
Installation is usually simple but requires care. Thorough cleaning, proper positioning, and avoiding overtightening can significantly reduce leaks in many cases.
By using high-quality seals, maintaining carefully, and cleaning regularly, your blender remains clean and efficient for years, preventing grease buildup on your countertop.

Hannah is a home and kitchen writer who focuses on practical cooking, meal prep, food storage, appliance care, and everyday kitchen organization. She enjoys sharing realistic tips that help make busy home routines feel simpler and less stressful. Through experience-based articles and easy-to-follow advice, Hannah aims to help readers save time, reduce food waste, organize their kitchens more efficiently, and feel more confident managing daily cooking and household tasks.