
Late in the evening, you walk into the kitchen and hear a persistent buzzing sound coming from the fridge. You notice that your hand feels burning hot when you touch the side of the fridge. Perhaps you also discover that the milk has spoilt a few days before its expiration date or that the ice cream has become disappointingly soft. Before you worry and call a repairman for a hefty bill, the problem is usually simple and can be fixed for free, completely hidden inside the fridge.
Refrigerators need to breathe, just like you. But right now, it might be covered in a thick layer of dust, pet hair, and kitchen grease, making it difficult for it to function properly. The condenser tubes are the unsung heroes of the kitchen, responsible for venting the heat that the fridge absorbs from the inside to the environment. When these tubes are covered with dust and dirt, the heat cannot escape. This means that the compressor has to run constantly and work twice as hard to maintain the temperature inside the fridge. One of the most important maintenance tasks to extend the lifespan of your expensive refrigerator and lower your monthly energy bill is learning how to properly clean the condenser coils.
Why Dirty Coils Cause Major Fridge Failures:
To understand why this is so important, you must first understand how a refrigerator works. Refrigerators do not blow out cold air but warm air. A portion of the liquid refrigerant absorbs heat from the food and flows to the condenser coils. These coils form a spiral and radiate heat into the kitchen air. As the heat dissipates, the refrigerant cools down and circulates back into the refrigerator, causing the process to repeat.
When these coils are covered with a thick layer of pet dander, lint, and kitchen dust, a very effective insulating layer forms. Heat cannot escape. The built-in thermostat detects that the refrigerator is too warm and starts the compressor to keep running. This continuous load significantly shortens the lifespan of the compressor, and the compressor is the most expensive part of a refrigerator. Eventually, the compressor overheats and shuts down completely, causing a lot of food to spoil and repair costs to skyrocket. By spending just twenty minutes cleaning this hidden section, you can prevent this chain reaction.
Safety First: Preparation
Safety first. Always be careful before touching any parts of the refrigerator. Refrigerators consume a lot of electricity, and operating mechanical parts while they are live is extremely dangerous. Pull the refrigerator away from the wall, just within reach of a power outlet, and unplug it. This cleaning process is quick, so you do not need to remove any food from the refrigerator. Keep the refrigerator door closed; the internal temperature remains safe during cleaning.
Next, you need to locate the condenser coil. Older refrigerators usually have a large black mesh structure at the back. The visible rear coil is usually the easiest to clean. However, in most modern refrigerators, the condenser coil is located at the bottom of the appliance, hidden behind a perforated bottom plate. This can be easily removed, although with some models it may be necessary to unscrew a few small screws first.
The Essential Tools You Need:
No special chemical cleaning agents are needed for this job. Liquid cleaning agents are actually very harmful to the refrigerator’s electrical components and are completely unnecessary. The entire cleaning process is dry cleaning. To do this properly, you only need two basic tools.
First, a vacuum cleaner with a crevice nozzle. A standard wide nozzle will not reach the narrow crevices at the bottom of the refrigerator. Second, a special brush for the cooling coils. This is a long, flexible brush with stiff bristles that can bend and reach into the narrow spaces between the pipes. You can buy one for a few euros at any hardware store. If you are allergic, it is advisable to also wear a dust mask, as a lot of dust particles will certainly be released into the air during the process.
The Step-by-Step Cleaning Process
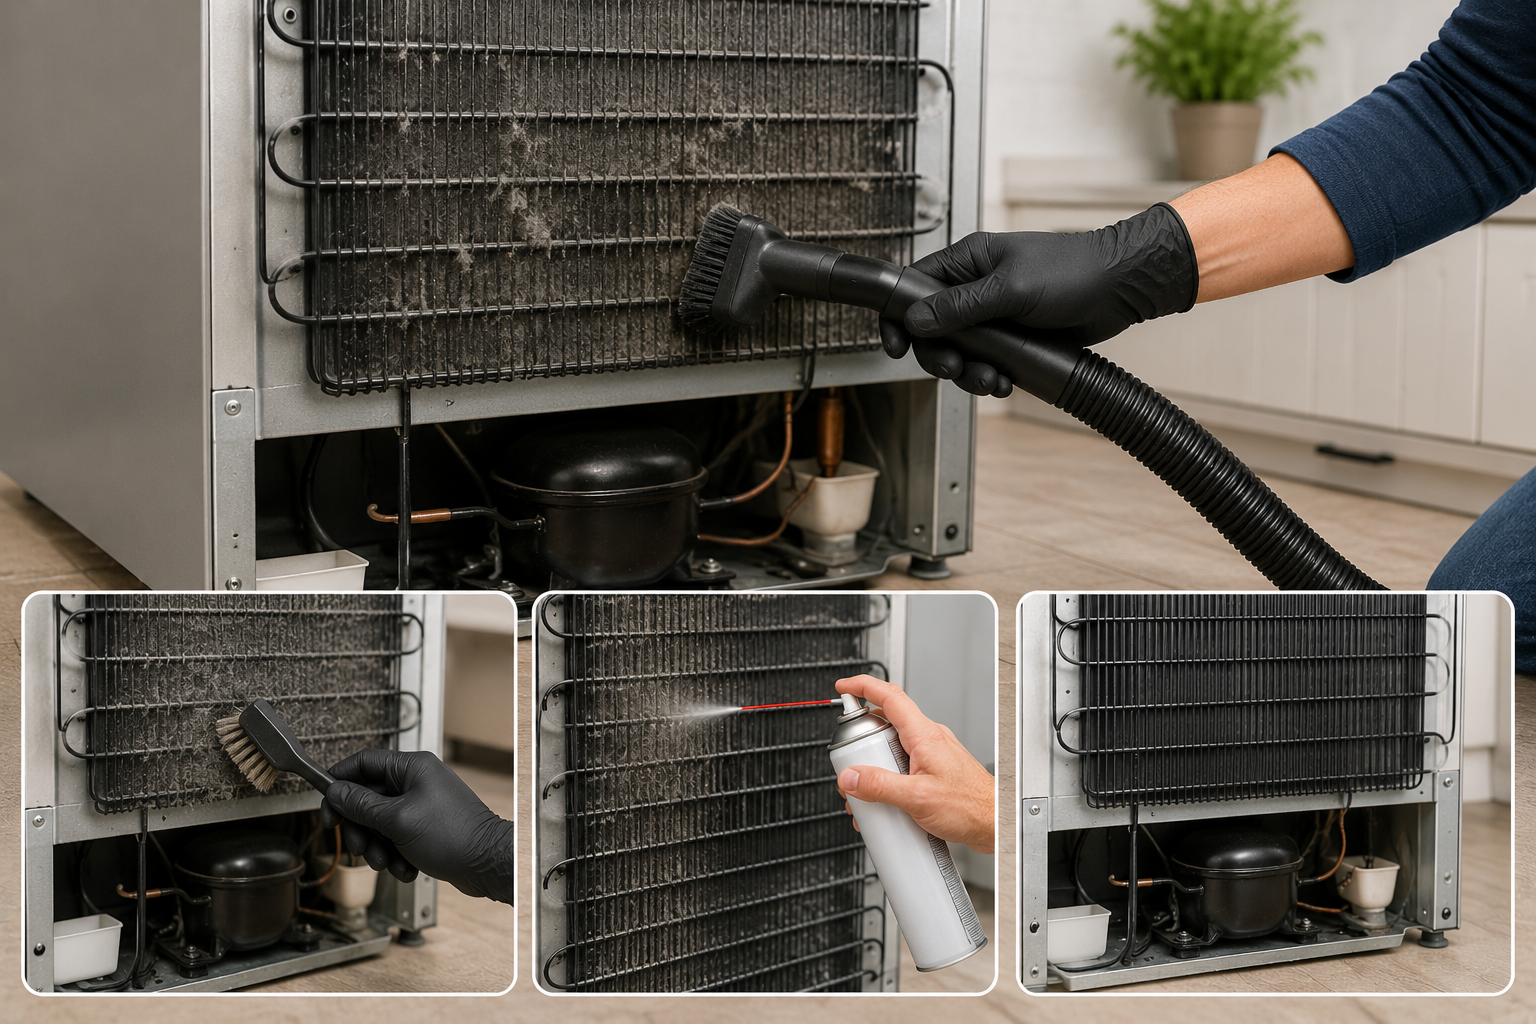
First, use a vacuum cleaner. Attach the crevice nozzle and set the vacuum to maximum suction power. Gently move the nozzle to the front of the condenser and vacuum up surface dust, cobwebs, and large clumps of pet hair. If the condenser is located at the bottom of the refrigerator, be careful not to accidentally damage the delicate condenser fins with the hard plastic nozzle. Move slowly and carefully and remove as much visible dirt as possible before picking up the brush.
Remove surface dust. Take the condenser brush and carefully insert it into the gaps between the condenser fins. Push the brush backward and then sweep smoothly forward. You will soon see a large, dense clump of dust fall from the depths of the refrigerator. This is intended to remove dirt that the vacuum cannot reach initially. If the condenser fin is particularly greasy (this often occurs in poorly ventilated kitchens), you may need to rotate the brush slightly to scrape the sticky lint off the metal.
The best approach is to use the vacuum and the brush simultaneously. Hold the vacuum nozzle in one hand, just above the condenser opening, and operate the brush with the other. The vacuum sucks up the dust while you sweep it with the bristles, preventing it from spreading to other parts of the kitchen or accumulating under the refrigerator. Repeat this scrubbing and vacuuming until the metal parts of the condenser are fully exposed. Finally, vacuum the floor under the refrigerator, replace the bottom grille, and plug the refrigerator back into the power outlet.
Maintenance Schedule and Preventative Care:
How often you need to clean depends, of course, entirely on the conditions in your home. A single person in a carpetless apartment will clean the condenser much less often than a large family with three dogs that shed a lot. Regular dusting is much easier than a year’s worth of removing greasy dust.
Here is a brief maintenance plan to help you determine how often you need to check your appliances:
|
Household Environment |
Cleaning Frequency |
Primary Risk Factors |
|---|---|---|
|
Heavy shedding pets (dogs/cats) |
Every 3 months |
Pet hair acts as rapid insulation |
|
Large family or high foot traffic |
Every 6 months |
High airborne dust and kitchen grease |
|
Recent home renovations |
Immediately after |
Drywall dust clogs coils instantly |
|
Low traffic, no pets |
Once a year |
Normal household lint accumulation
|
Common limescale build-up in household refrigerators
Although it is important to establish a maintenance plan, the refrigerator itself also gives warning signs. If you are considering disassembling your refrigerator, pay attention to the following important warning signs:
- The refrigerator makes an extreme amount of noise and seems never to stop running.
- The fins on the front between the sides or doors of the refrigerator feel very hot.
- There is excessive ice buildup in the freezer compartment, and the temperature inside the refrigerator is too high.
- Your monthly energy bill is rising inexplicably.
Frequently Asked Questions
Can I clean the refrigerator’s condenser coils with compressed air?
Although compressed air can blow away dust, it is not recommended. Blowing pressurised compressed air into the refrigerator will usually only suck dust deeper into mechanical parts, such as the condenser fan, or spread dirt throughout your clean kitchen. Using a vacuum cleaner with a brush attachment removes dust more thoroughly and effectively.
Do I need to empty the refrigerator before disassembling it to clean the condenser coils?
No, you do not need to remove any food. The entire cleaning process usually takes less than twenty minutes. As long as you keep the refrigerator and freezer doors closed during cleaning, the cold air remains inside, and your food is completely safe.
What if my condenser is completely enclosed in a metal casing?
Some of today’s most expensive refrigerators have a condenser that does not require manual cleaning. The condenser is completely enclosed and protected from dust on the inside. Remove the bottom grille; if you only see a solid metal casing without a condenser, you should consult the manufacturer’s manual. Your refrigerator likely uses a closed system that does not require manual cleaning.
How much electricity can I save by cleaning the condenser?
Energy efficiency experts say that a heavily clogged refrigerator can consume up to 35% more electricity than a refrigerator with a cleaned condenser. Refrigerators are one of the few appliances in your home that run 24/7, and improving their energy efficiency can save you significantly on your electricity bill over the year.
Can dirty coils permanently break the refrigerator compressor?
That is correct. If the condenser cannot dissipate heat properly, the compressor must run continuously to lower the internal temperature. This continuous operation can lead to compressor overheating, damage to the internal lubricating oil, and, ultimately, to mechanical failure. Replacing a burnt-out compressor typically costs almost as much as purchasing a new refrigerator.
A Quieter, Cooler Kitchen
Maintaining household appliances doesn’t have to be a chore; don’t let it deter you. With just twenty minutes of your time and a few euros for a simple condenser brush, you can significantly improve your refrigerator’s performance. After a thorough cleaning, plug the refrigerator back in, and you will likely notice the difference immediately. The previously loud hum gives way to quiet, efficient operation, and the exterior cools down to a normal temperature. Most importantly, you can be sure that your food is safe and that the appliance is working properly again.

Hannah is a home and kitchen writer who focuses on practical cooking, meal prep, food storage, appliance care, and everyday kitchen organization. She enjoys sharing realistic tips that help make busy home routines feel simpler and less stressful. Through experience-based articles and easy-to-follow advice, Hannah aims to help readers save time, reduce food waste, organize their kitchens more efficiently, and feel more confident managing daily cooking and household tasks.